-
Add to CMSIS Solution
packs:- pack: Microchip::CMSIS-Driver_DVRT@1.0.4
Add with cpackget
> cpackget add Microchip::CMSIS-Driver_DVRT@1.0.4
Download
Microchip.CMSIS-Driver_DVRT.1.0.4.packIntroduction to the Data Visualizer Run Time (DVRT) protocol
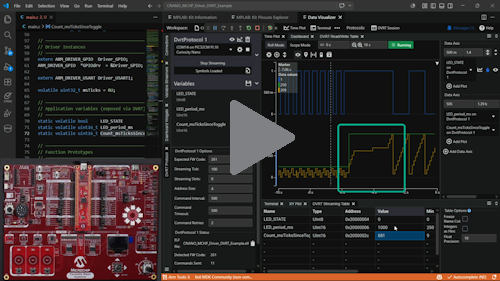
Introduction to DVRT Running the DV Run Time Driver Example 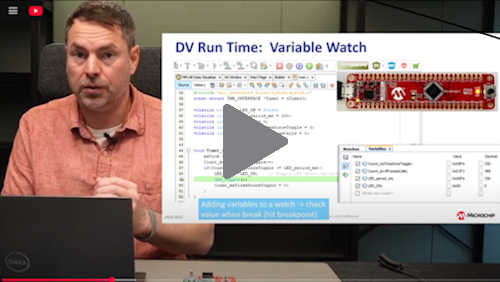
Adding DVRT to an Existing Project 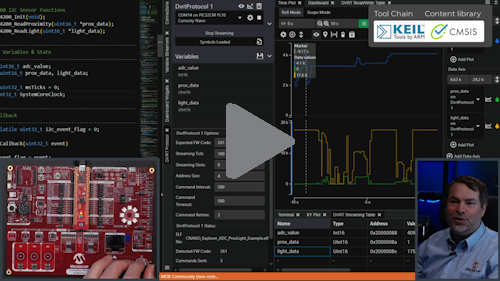
Overview
This CMSIS Pack provides middleware that enables real-time variable streaming and monitoring between your embedded application and the Microchip MPLAB® Data Visualizer. DVRT allows you to:
- Monitor variables in real-time without halting the CPU
- Modify variables on-the-fly from the Data Visualizer GUI
- Visualize data using time plots, dashboards, and custom displays
The middleware handles all protocol communication over USART, with an integrated ring buffer for reliable interrupt-driven reception.
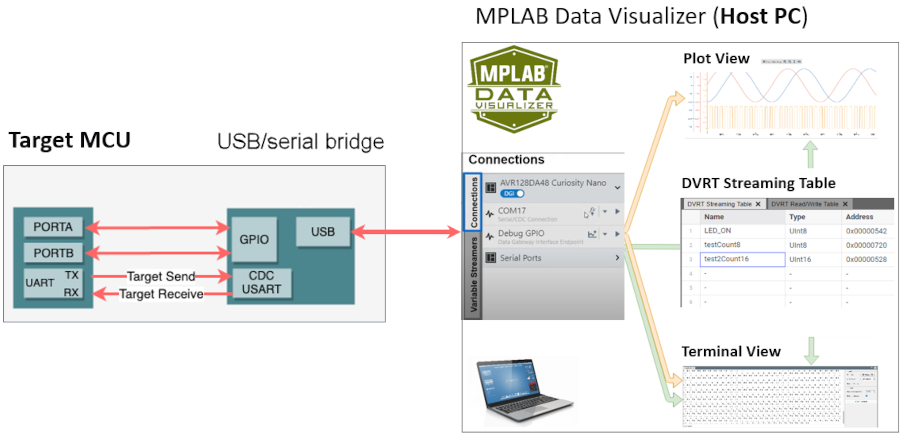
The DV Run Time Protocol System is implemented across both microcontroller (MCU) and MPLAB Data Visualizer (Host PC).
DV Run Time Implementation
Features
- CMSIS-Driver USART communication (portable across Cortex-M devices)
- Integrated ring buffer for robust RX handling (no user implementation required)
- Bidirectional communication for variable monitoring and control
- Up to 8 monitored variables simultaneously
- Configurable streaming interval (default 20ms)
- Template provided for quick integration
Responsibilities: MCU Side and HOST PC Side
The figure below shows how the DVRT works in the main Streaming mode. It is composed of two sides, an MCU side (DVRT_M) and a PC Host application (DVRT_H) communicating through a bi-directional UART protocol.
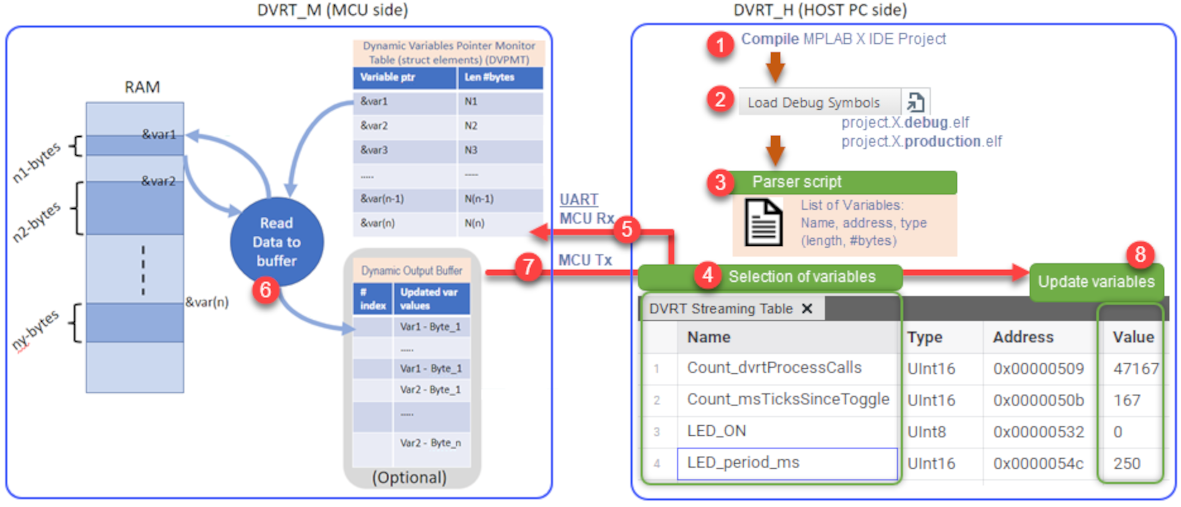
- MPLAB X IDE MCU Project is compiled and an .elf file produced.
- The .elf file is loaded in the Data Visualizer.
Note: Choose the debug or production version of the .elf, matching your compilation settings.
- A Parser script is used to generate a list of variables.
Note: For volatile variables, this .elf file contains their name, address and type (length in bytes), i.e., at compile time, it is known where volatile variables will be located in the Microcontroller's RAM.
- DVRT Streaming Table is used to select variables of interest to watch at run time.
- As variables are selected, the DVRT command UPDATE_VARIABLE_POINTER_TABLE is sent to the microcontroller to add these variables to a Dynamic Variables Pointer Monitor Table (DVPMT).
Note: For each variable, this is the address of the variable in the MCU's RAM, and the number of bytes is saved.
- The values of variables are fetched from specific locations in RAM and the Dynamic Output Buffer now contains updated values of each variable in the DVRT Streaming Table.
- Data Output Buffer sent over UART to Data Visualizer.
- Variable values updated in the DVRT Streaming Table.
Data Stream Protocol Format
The DV Run Time at the lowest level implements the Data Stream protocol to send data to the Data Visualizer.
The Data Stream Format is processed in the same order as the variables specified in the Variable Streamer. All data must be given as little-endian values, meaning sending the lowest byte first. Additionally, the Data Streamer Protocol requires a start byte and an end byte which are each other's complement (~). For example, if the startByte is: 0b0000 0011, the endByte will be 0b1111 1100. This wrapper, consisting of one byte before and one byte after the data stream variables, is used by the interpreter to synchronize it to the data stream. The start byte can be arbitrary, but the end byte must be the inverse of the start byte.

Requirements
Dependency Version ARM CMSIS 6.2.0+ CMSIS-Driver USART Any compliant implementation Quick Start
The two main entry points are:
- Running the CNANO MCHP Driver DVRT Example included in the pack
- Adding DVRT to an Existing Project
1. Running the CNANO MCHP Driver DVRT Example
The easiest entry point is to run the example included in the pack. See the video Arm CMSIS Solution - Running the DV Run Time Driver Example for a step-by-step walkthrough.
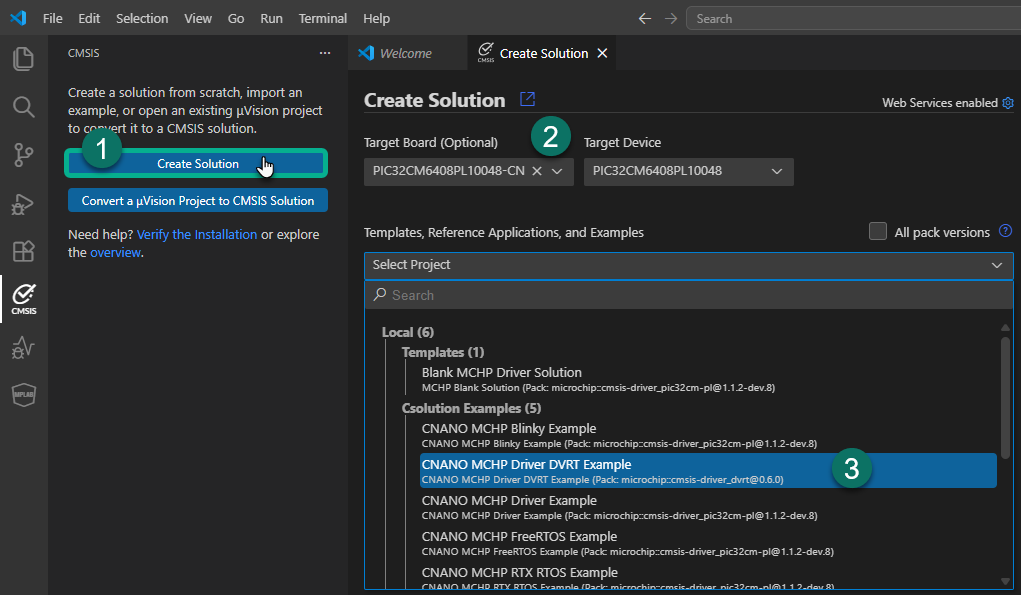
To create the example project in VS Code:
- Open the CMSIS extension sidebar and click Create Solution
- Select your Target Board (e.g., PIC32CM6408PL10048-CN) and Target Device
- Under Csolution Examples, select CNANO MCHP Driver DVRT Example
2. Adding DVRT to an Existing Project
Adding DVRT to an existing project involves adding the required packs and components, configuring compiler settings for Data Visualizer compatibility, rebuilding the solution, adding the DVRT code template, and exposing variables for monitoring.
1. Adding Required Packs and Components
- Add the pack to your
*.csolution.yml:
yaml packs: - pack: Microchip::CMSIS-Driver_DVRT- Add the component to your
*.cproject.yml:
yaml
   components:
     - component: Middleware:DVRT:Core
Note: Opening the Manage Software Components, then under Middleware > DVRT, checking Core then saving, achieves the same as adding
Middleware:DVRT:Coreto the list of components in*.cproject.yml.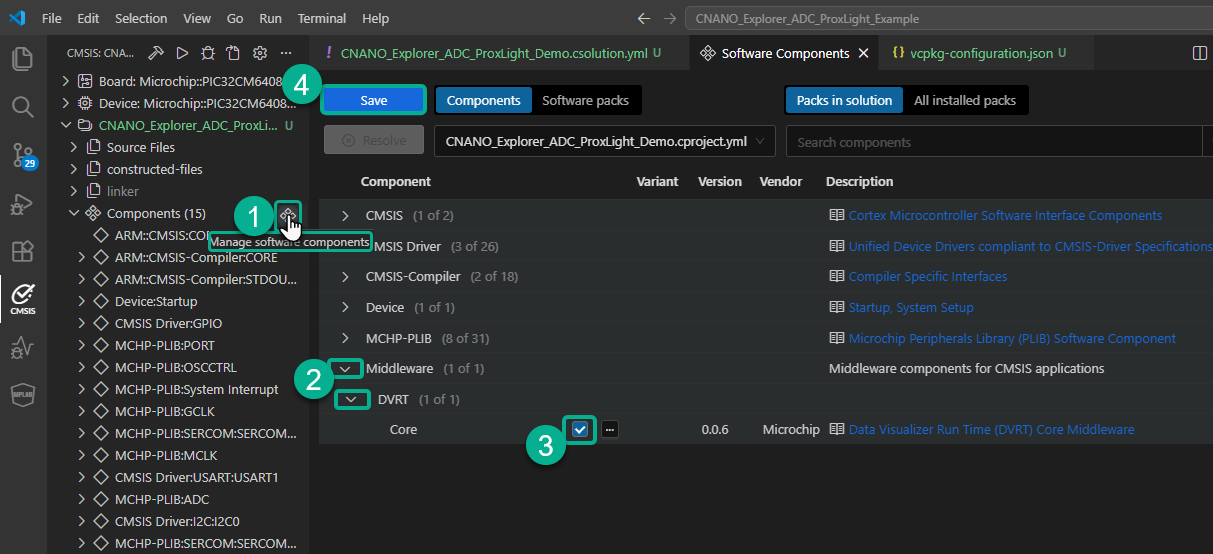
2. Select a GCC Compiler Version to add it to vcpkg-configuration.json
- Click on Arm Tools in the status bar to open the Arm Registry
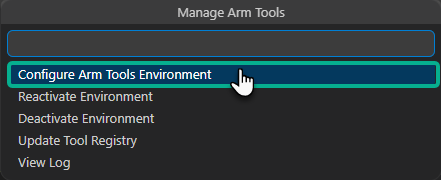
- Select a GCC compiler for ARM CPUs version (e.g., 14.3.1)
This adds
"arm:compilers/arm/arm-none-eabi-gcc": "14.3.1"tovcpkg-configuration.json.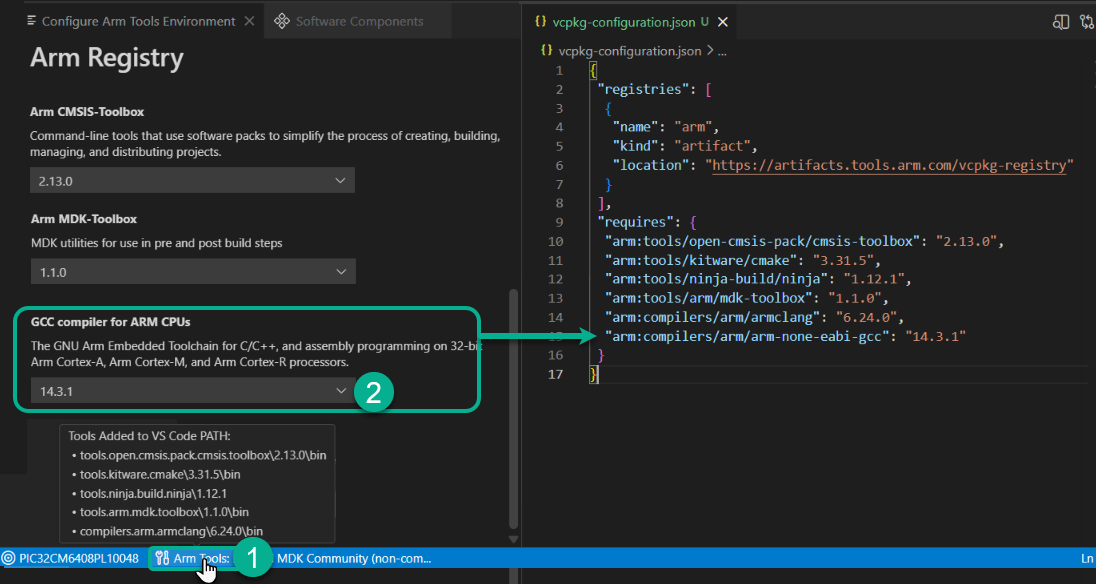
3. Compiler Settings (GCC)
Data Visualizer reads debug symbols from
*.elffiles generated by the GCC compilers. All the non-default settings listed below have comments. Add these lines to your*.csolution.yml:# A solution is a collection of related projects that share same base configuration. solution: created-for: CMSIS-Toolbox@2.13.0 cdefault: # Compilers that can be selected select-compiler: - compiler: AC6 - compiler: GCC - compiler: IAR - compiler: CLANG - compiler: XC # List of miscellaneous tool-specific controls misc: - for-compiler: AC6 C-CPP: - -gdwarf-5 ASM: - -gdwarf-5 - for-compiler: GCC # Required for Data Visualizer DVRT C-CPP: - -gdwarf-4 # Required for Data Visualizer DVRT - -fms-extensions # Required for Data Visualizer DVRT - -Wno-unknown-attributes # Required for Data Visualizer DVRT ASM: - -gdwarf-4 # Required for Data Visualizer DVRT # List the packs that define the device and/or board. packs: - pack: Microchip::PIC32CM-PL_DFP - pack: ARM::CMSIS - pack: Microchip::CMSIS-Driver_PIC32CM-PL - pack: Microchip::CMSIS-Driver_DVRT # Required for Data Visualizer DVRT (added in step 1) # List different hardware targets that are used to deploy the solution. target-types: - type: PIC32CM6408PL10048 device: PIC32CM6408PL10048 board: PIC32CM6408PL10048-CNANO:Rev 1 # List of different build configurations. build-types: - type: Debug debug: on # Required for Data Visualizer DVRT (default: off) optimize: none - type: Release debug: on optimize: balanced # List related projects. projects: - project: CNANO_MCHP_Blinky_Example.cproject.yml compiler: GCC # Required for Data Visualizer DVRT (default: AC6)4. Clean and Rebuild Solution
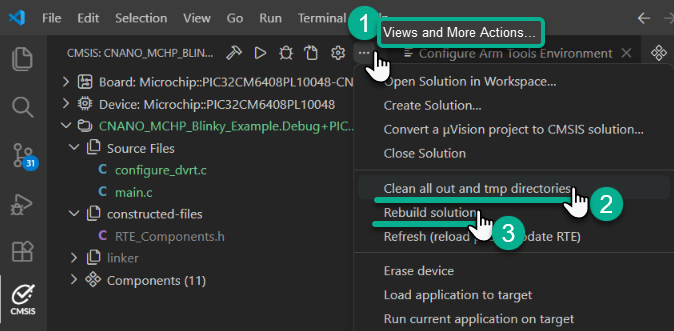
- Click on Views and More Actions... (three dots menu in CMSIS panel)
- Select Clean all out and tmp directories
- Select Rebuild solution
If this works, you should see a notification: "Completed: cbuild succeed with exit code 0"
5. Adding the Code Template
- In VS Code, click on the
 icon next to Source Files and select Add From Component Code Template

- Select Middleware:DVRT:Core DVRT Example Template from the list

This adds
configure_dvrt.cto your project, which providesDVRT_Init()for USART and DVRT initialization. Click Add when prompted to "Add Template Files to..." project directory.Update your
main.cto initialize and run DVRT:6. Using the Code Snippet
- Add
#include "dvrt.h"to main.c - Declare
DVRT_Initand externs forARM_DRIVER_USARTandARM_DRIVER_GPIO - USART setup:
- 3.1. Enable USART peripheral clock (GCLK + MCLK)
- 3.2. Enable USART NVIC interrupt (DVRT uses interrupt-driven RX to quickly respond to commands from MPLAB Data Visualizer)
- 3.3. Configure USART TX/RX pins with peripheral muxing
- 3.4. Enable pull-up on RX pin (so DVRT can respond quickly to Data Visualizer commands)
- Call DVRT_Init() to initialize USART with DVRT callback
- Call DVRT_Process() every 1 ms (from main loop or SysTick)
// main.c
#include "dvrt.h"  // TODO 1: Include DVRT header

// TODO 2: Declare DVRT_Init and externs for ARM_DRIVER_USART and ARM_DRIVER_GPIO
extern ARM_DRIVER_USART Driver_USART1;
extern ARM_DRIVER_GPIO Driver_GPIO;
extern void DVRT_Init(ARM_DRIVER_USART *usart_drv, uint32_t baud_rate);

void configure_clock(void)
{
    // TODO 3.1: Enable GCLK + MCLK for SERCOM1
}

int main(void)
{
    configure_clock();
    NVIC_EnableIRQ(SERCOM1_IRQn);                                        // TODO 3.2: Enable USART NVIC interrupt
    PORT_SetPeripheralMuxing(PIN_PA00, PORT_PERIPHERAL_FUNC_D);          // TODO 3.3: TX pin muxing
    PORT_SetPeripheralMuxing(PIN_PA01, PORT_PERIPHERAL_FUNC_D);          // TODO 3.3: RX pin muxing
    Driver_GPIO.SetPullResistor(PIN_PA01, GPIO_PULL_UP);                 // TODO 3.4: RX pullup so DVRT responds quickly

    DVRT_Init(&Driver_USART1, 115200U);                                  // TODO 4: Initialize DVRT

    SysTick_Config(SystemCoreClock / 1000U);  // 1 ms tick
    __enable_irq();

    while (1)
    {
        DVRT_Process();                                                  // TODO 5: Call DVRT_Process every 1 ms
        delay_ms(1);
    }
}
Note: If the USART was previously used, e.g. for printf (and you'd like to keep using printf startup state messages), call
Uninitializefirst before the USART setup TODOs andDVRT_Init().7. Expose Variables
Make variables you want to monitor
volatileand global://----------------------------------------------------------------------------- // Global Variables & State //----------------------------------------------------------------------------- volatile int16_t adc_value; volatile uint16_t prox_data, light_data;Note: These are just example variables from the CNANO Explorer ADC ProxLight Example.
8. Update Timing Interval of DVRT Variables
You'll likely want to update variables used for DVRT much more frequently than you would for printf. See the example below:
// Timing Definitions
#define SYSTICK_HZ              1000U   // 1 ms tick
#define MAIN_LOOP_DELAY         5U      // 5 ms
#define LED_TOGGLE_MS           250U
#define PRINTF_INTERVAL_MS      1000U
#define DVRT_INTERVAL_MS        100U    // Call DVRT_Process every 100 ms
Using Data Visualizer
For detailed instructions, see the Data Visualizer User Guide.
- Build your project with debug symbols enabled
- Program the device
- Open MPLAB Data Visualizer
- Load ELF via File > Load ELF Production File
- Connect to the Curiosity Nano virtual COM port at 115200 baud
- Drag variables from the Variables panel to a Time Plot
- Click Play to start streaming
To modify a variable, right-click it in the Variables panel and enter a new value.
Note: Also see the Data Visualizer Setup for DV Run Time from the MCC Melody API Reference for DV Run Time Library v2.0.0.
API Reference
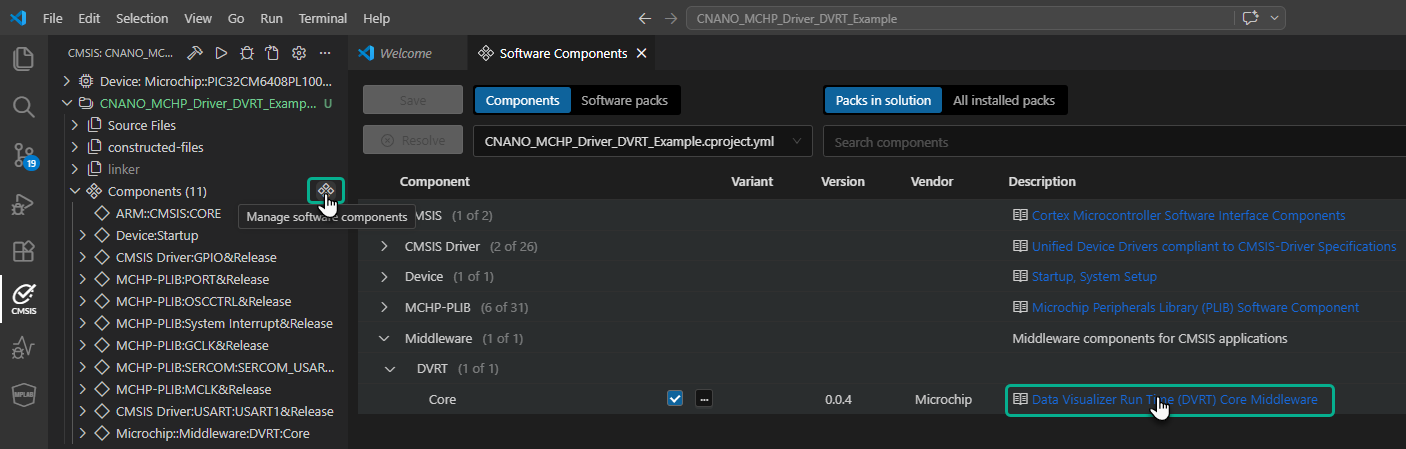
To access the full API documentation, open the Software Components view, expand Middleware > DVRT, and click the Data Visualizer Run Time (DVRT) Core Middleware link in the Description column.
Configuration
Edit
dvrt_local.hto customize behavior:Define Default Description DYNAMIC_VAR_PTR_COUNT8 Maximum number of monitored variables DV_STREAM_TIME20 Streaming interval in DVRT_Process() calls DV_RX_CMD_TIMEOUT200 Command timeout in DVRT_Process() calls DV_FW_CODE261 Firmware identification code for ping response DVRT_RX_BUFFER_SIZE512 Ring buffer size (in dvrt_usart_adapter.c) Supported Devices
Any ARM Cortex-M device with:
- CMSIS-Core support
- CMSIS-Driver USART implementation
- Sufficient RAM for the ring buffer (512 bytes default)
Tested on:
- PIC32CM family (Cortex-M0+)
Troubleshooting
Issue Solution Data Visualizer shows "Failed to respond to Ping" Ensure RX pin has pull-up enabled; verify USART interrupt is enabled No variables visible in Data Visualizer Rebuild with debug symbols ( debug: on); use GCC compiler for .elf outputStreaming stops unexpectedly Check that DVRT_Process()is called consistently every ~1msVariables not updating Ensure variables are declared volatileand globalLicense
Apache 2.0 - See https://pack-content.cmsis.io/Microchip/CMSIS-Driver_DVRT/1.0.4/LICENSE.txt
Support
For support questions, contact Microchip Support through https://www.microchip.com/en-us/support.